REDHAT LINUX SERVER में केसे USER ACCOUNTऔरGROUP बनाये part 2 ?
हेल्लो दोस्तों जैसा की आप ने मेरे पिछले आर्टिकल ( REDHAT LINUX SERVER में केसे USER ACCOUNTऔरGROUP बनाये part 1 ?)में देखा की हमे Linux server में क्यों Userऔर Group की आवश्यकता पड़ती है ! और हम केसे UserऔरGroup बना सकते है और Delete कर सकते है Next इस Process को Continue करते हुए हम ये सीखेंगे की किस तरह से किसी User का expire date set किया जा सकता कैसे User को Lock किया जा सकता है ! और भी बहुद कुछ
1=यहाँ इस कमांड के through ये देखा जाता है की कितने User बिना password के है
[root@localhost ~]# awk -F: '($2==""){print}' /etc/shadow
2=यहाँ हम देखते हे की एक साथ के से Blank password user को Block किया जा सकता है
[root@localhost ~]# passwd -l satish
Locking password for user satish.
passwd: Success
[root@localhost ~]#
3=यहाँ हम देखते है की किस Account को Root की permission मिली हुई है जिस Account को Root /(administrative ) की permission होती है उसकी UID set ‘0’ होता है
[root@localhost ~]# awk -F: '($3=="0"){print}' /etc/passwd
root:x:0:0:root:/root:/bin/bash
[root@localhost ~]#
4=कोई भी User account से related information को केसे देखा जाता है
[root@localhost ~]# chage --list hindi
Last password change                                    : Jan 22, 2017
Password expires                                        : never
Password inactive                                       : never
Account expires                                         : never
Minimum number of days between password change          : 0
Maximum number of days between password change          : 99999
Number of days of warning before password expires       : 7
5= यहाँ में एक User Account को फरवरी 16 को Expire करना हे तो -M कमांड के Through इस तरह से करते है
[root@localhost ~]# chage -M25 hindi
[root@localhost ~]# chage --list hindi
Last password change                                    : Jan 22, 2017
Password expires                                        : Feb 16, 2017
Password inactive                                       : never
Account expires                                         : never
Minimum number of days between password change          : 0
Maximum number of days between password change          : 25
Number of days of warning before password expires       : 7
6=हम किसी Fix Expire date के सात भी user को create कर सकते है निम्न Commands के through
[root@localhost ~]# useradd -e 2017-02-16 ishita
[root@localhost ~]# chage -l ishita
Last password change                                    :Jan 24, 2017
Password expires                                        : never
Password inactive                                       : never
Account expires                                         :Feb 16, 2017
Minimum number of days between password change          : 0
Maximum number of days between password change          : 99999
Number of days of warning before password expires       : 7
7=यहाँ हम किसी Accounts में इस तरह की permission भी सेट कर सकते है की अगर वो user ३० तक अपना Account Login ना करे तो automatic lock हो जाये
[root@localhost ~]# chage -I30 hindi
अगर इस Account में 30 दिन तक login नही किया गया तो Automatic lock हो जाये गा
8=निम्न Commands के द्वारा हम किसी भी Accounts का status देख सकते है
[root@localhost ~]# passwd -S hindi
hindi LK 2017-01-21 0 25 7 30 (Password locked.)
You have new mail in /var/spool/mail/root
9=हम Linux operating system में जो भी Account बनाते है वो by-default Home directory में ही बनता है पर हम उसको customize करके कही भी किसी भी Directory में बना सकते है
 इसतरह से Home directory से अलग दूसरी directory में user बनाया जाता है
[root@localhost ~]# mkdir -p /demo1
[root@localhost ~]# mkdir -p /demo1/demo2
[root@localhost ~]# useradd -d /demo1/demo2/hindiit hindiit
[root@localhost ~]# passwd hindiit
Changing password for user hindiit.
New UNIX password:
BAD PASSWORD: it is based on a dictionary word
Retype new UNIX password:
passwd: all authentication tokens updated successfully.
10=हम अपनी Customize User ID से भी User account बना सकते है उदारणत: मुझे 520 ID का एक User Account बनाना है तो में इस प्रकार से निम्न Commands use कर सकते है!
[root@localhost ~]# useradd -u 900 -g520 demo4
11=हम एक कोई Customize comments के साथ भी User को add कर सकते है
[root@localhost ~]# useradd -c"hello this is demo5" demo5
demo5:x:901:901:hello this is demo5:/home/demo5:/bin/bash
12=User account बनने के बाद उसकी information को भी change कर सकते है इसके लिए chfn commands का use किया जाता है
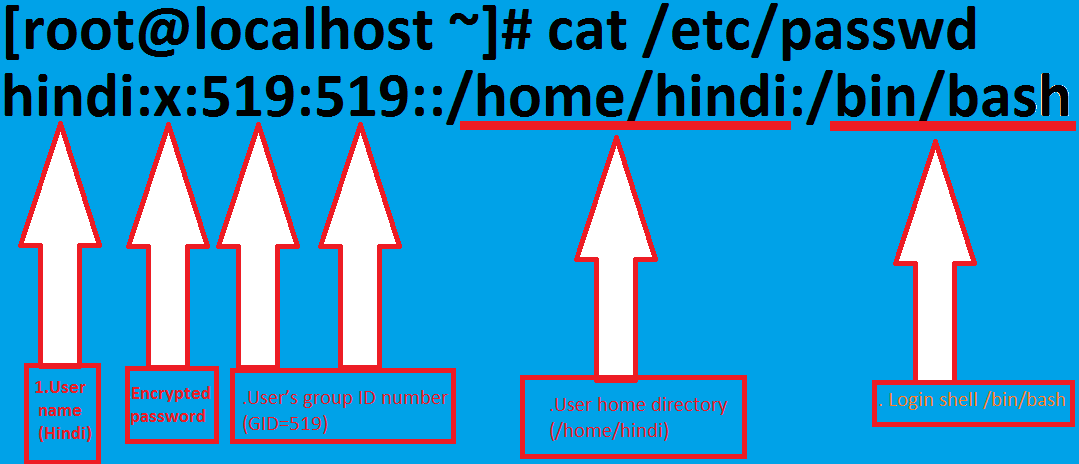
[root@localhost ~]# cat /etc/passwd|grep hindi
hindi:x:519:519::/home/hindi:/bin/bash
hindiit:x:527:527::/demo1/demo2/hindiit:/bin/bash
[root@localhost ~]# chfn hindi
Changing finger information for hindi.
Name []: english
Office []: vishnu sharma form bhilwara
Office Phone []: 72968765
Home Phone []: 265077
Finger information changed.
[root@localhost ~]# cat /etc/passwd|grep hindi
hindi:x:519:519:english,vishnu sharma form bhilwara,72968765,265077:
/home/hindi:/bin/bash
hindiit:x:527:527::/demo1/demo2/hindiit:/bin/bash
13=हम chsh mod से किसी भी User Account की Shell भी Change कर सकते है
[root@localhost ~]# cat /etc/passwd|grep hindiit
hindiit:x:527:527::/demo1/demo2/hindiit:/bin/bash
[root@localhost ~]# chsh hindiit
Changing shell for hindiit.
New shell [/bin/bash]: /bin/ksh
Shell changed.
14=Without home directory user कैसे Create किया जाता है ? यहां हमने एक Without home directory user create किया है Demo 6 नाम से जो Home Directory में नही है
[root@localhost ~]# useradd -M demo6
[root@localhost ~]# ls -l /home/demo6
ls: /home/demo6: No such file or directory
15=हम एक User को multi pal Group में भी Add कर सकते है निम्न Commands से
[root@localhost ~]# groupadd java
[root@localhost ~]# groupadd redhat
[root@localhost ~]# groupadd php
[root@localhost ~]# groupadd sql
[root@localhost ~]# useradd ishu
[root@localhost ~]# passwd ishu
Changing password for user ishu.
New UNIX password:
BAD PASSWORD: it is too short
Retype new UNIX password:
passwd: all authentication tokens updated successfully.
[root@localhost ~]# useradd -G java,redhat,php,sql ishu
useradd: user ishu exists
16=Custom Shell के साथ भी User को create कर सकते है
[root@localhost ~]# cat /etc/shells
/bin/sh
/bin/bash
/sbin/nologin
/bin/tcsh
/bin/csh
/bin/ksh
[root@localhost ~]# useradd -s /bin/csh deepit
[root@localhost ~]# tail -l /etc/passwd
deepit:x:905:909::/home/deepit:/bin/csh
दोस्तों ये tutorial Linux learner के लिए बहुद ही महत्वपूण है हो सकता है की मेरे द्वारा Describe की गए सारे Commands आपको remember नही हो परन्तु इनमे से Account को Add करना remove करना Group में add करना ये कुछ महत्वपूण Commands तो याद रखना अनिवार्य है ही इनसब Commands की आपको Server hosting Security आदि में आवश्यकता पड़ेगी इस Process को continue रखते हुए पार्ट-3 भी है
अगर आपको किसी Commands या process में Problem आती है तो आप comments box में Commants कर सकते है में आप की problems solve करुगा Other -way आप मेरी Website को फॉलो करेbookmark kre निरन्तर new tutorial आईटी से रिलेटेड मिलते रहे गे अगर आप LINUX NETWORKING WINDOWS से Related महत्वपूण जानकारी चाहते तो मेरी एक और website www.visworlditsolution.com जो की English में है वहा से प्राप्त कर सकते है
धन्याद
writer-Vishnu Sharma